

Welcome back, fellow developers! Today, we are once again delving into JavaScript and Web Development and learning about throttling.
As a developer, making your website user-friendly is important. This goes a long way toward the product's success, and a key part of the user experience is the website's performance.
In a previous tutorial, I discussed how to improve the performance of any feature using a technique called debouncing. And you can use a similar technique, called throttling, but in a slightly different scenario. You'll learn how to implement throttling in this article.
For this guide, I am assuming you have a basic knowledge of JavaScript. Don't worry if you are a beginner – I have provided simple and detailed explanations to guide you through. So, let's dive right into it!
Table of Contents
- What is Throttling?
- How to Implement Throttling in JavaScript
- What is a Closure in JavaScript?
- Use Case of Function Throttling
What is Throttling?
Throttling is a technique used to limit the rate at which a function is called. Throttling transforms a function such that it can only be called once in a specific interval of time.
Let's understand this with an example. Let's take a function fun():
function fun() {
    console.log('This is a function')
}
We want to modify this function so that it can only be called once in 500ms. So, throttling will take fun() as an input, and return a modified (throttled) function throttledFun() that can only be executed 500ms after the previous function was executed.
When you call throttledFun() multiple times within 500ms, fun() will only be executed the first time. You will have to wait 500ms before fun() can be executed again. This happens after every subsequent function call. Thus, fun() can only be called once every 500ms.
How to Implement Throttling in JavaScript
Let's first understand what we want to achieve with throttling:
- Call the function immediately the first time.
- After each call, prevent the function from being called again for a certain time period.
- Once that time period has passed, the function can be called again.
To do all this, let's first create a helper function that will return a throttled function:
function throttle(func, delay) {
      return () => {}   // return throttled function
}
For any use cases, the throttled function will be used instead of the original fun().
Let's start by simply calling the function like this:
function throttle(func, delay) {
  return () => {
        func()
    }
}
Once the function is called, we want to block it from being called again for a certain time period delay. Once the time has passed, we want to unblock the function. We can achieve this behaviour using setTimeout.
For now, let's keep the setTimeout empty. You'll understand how it works in a minute.
setTimeout(() => {}, delay)Next, we'll declare a variable timeout that will be initialized only once in the outer function (that is the throttle() function). The setTimeout method returns a unique timeout id that we can use to identify a timeout. We'll assign the current timeout id to timeout.
function throttle(func, delay) {
    let timeout=null
    return () => {
        func()
        timeout=setTimeout(() => {
            // do something
        }, delay)
    }
}
Since timeout contains the id of the current timeout, we add a condition at the start of the throttled function to check if a timeout exists before calling the original function func().
function throttle(func, delay) {
    let timeout=null
    return () => {
        if(!timeout) {
            func()
            timeout=setTimeout(() => {
                // do something
            }, delay)
        }
    }
}
Initially, timeout is null, so the function is executed. The throttled function then starts a new timeout and assigns it to the timeout variable. In the next function call, it checks if a timeout exists before calling func(). If a timeout already exists, it does not execute func().
But what happens after the time period of delay has passed? Inside the setTimeout we need to do something that enables func() to be called again. Since we are using timeout to control the function calls, we set it to null after delay milliseconds.
timeout=setTimeout(() => {
    timeout=null
}, delay)
Now, when you call the function, it is executed and the process repeats by starting a new timeout. We have successfully throttled the function.
But there's something fundamental that we are still overlooking. In the current function call, once we assign setTimeout to the timeout variable, for the next one we are assuming that timeout is still valid and holds the value that we want – even if the variable is declared inside the throttle() function.
How is the inner function still able to have access to the variable long after the throttle() function has finished execution? It uses a concept called a closure. Let's take a quick detour to visit this concept.
What's a closure in JavaScript?
In JavaScript, an inner function always has access to the local variables of the outer function. In our case, the inner function has access to timeout that has function level scope in the throttle() method.
But when the outer function returns this inner function, the inner function still holds a reference to the local variables of the outer function long after the outer function has finished execution. This is the concept of a closure.
Let's understand closures with an example.
function outerFunction() {
  const x = 5;

  return () => {
    console.log(x);
  }
}

const inner = outerFunction();

inner(); // prints 5

// console.log(x)   Throws reference error
Here, if we call inner(), the code runs without any errors and prints 5. But, if we try to access x directly, JavaScript throws a reference error.
Here, inner() closes over x and only this function can use the variable and no one other one can. We cannot access the variable explicitly.
You can check out this beginner-friendly tutorial to learn more about closures.
Back to throttling
Let's continue from where we left off.
function throttle(func, delay) {
    let timeout=null
    return () => {
        if(!timeout) {
            func()
            timeout=setTimeout(() => {
                timeout=null
            }, delay)
        }
    }
}
We have seen that JavaScript uses closures to hold access to timeout every time we call the throttled function.
With this, we have a basic implementation of function throttling.
Let's test it out by using the above fun() method and throttling it with a delay of 500ms. This function should only be able to execute once every 500ms.
const throttledFun = throttle(fun, 500)
Let's call throttledFun() in different ways and see how it executes.
throttledFun(); // This will execute immediately
throttledFun(); // This will be ignored
setTimeout(() => {
  throttledFun(); // This will also be ignored
}, 300);
setTimeout(() => {
  throttledFun(); // This will execute
}, 600);
The first function call will execute immediately. For the next 500ms (throttling delay in this example), no matter how many times you call throttledFun(), nothing will happen.
So, the second function call and the third one won't execute, because they occur within 500ms of the first call. Once 500ms have passed, the next function call – that is, the last one – will execute, since the call is being made after 500ms.
Thus, it will print the following output:
This is a function
This is a function // Printed after 600ms
The solution is not complete yet. Our approach does not take into account function arguments. So, let's modify fun() to have two arguments:
function fun(a,b) {
    console.log(`This is a function with args ${a} and ${b}`)
}
To incorporate arguments, use the spread operator ... and store all arguments in a variable args:
function throttle(func, delay) {
    let timeout=null
    return (...args) => {
        if(!timeout) {
            func(...args)
            timeout=setTimeout(() => {
                timeout=null
            }, delay)
        }
    }
}
Now, call throttledFun() again, with arguments like this:
throttledFun(2,3);This will print This is a function with args 2 and 3.
Use Case of Function Throttling
Let's see how throttling is used in practical applications. We'll take a button that makes a call to the backend server when a user clicks it. An API call is made every time someone clicks the button.
But an API request can take some time, and if the user clicks the button again, or repeatedly in a short time, more and more API calls are made which could overload the server. To avoid this behaviour, we use function throttling. Let's implement this with React.
Set Up the Project
Run create-react-app in your terminal or use a modern built tool like Vite to create your React app. Remove the existing boilerplate code. There is no need to install any additional dependencies. Run npm start command to start the project. You can find the complete code on GitHub.
I have set up a Node server to fetch data for the app. You can find it in the Git repo. Run the node server command to start it. I am not going to show the Node.js code as it's out of the scope of this tutorial.
Let's start with the implementation.
App Component
In the App component, let's create a button with an onClick handler that makes an API call to the Node server.
function App() {
  const fetchData = async () => {
    const resp = await fetch("http://localhost:8000/data");
    return resp.json();
  };
  const handleClick = () => {
    fetchData().then((data) => {
      console.log(data);
    });
  };

  return (
    <div className="App">
      <button onClick={handleClick}>Click Me</button>
    </div>
  );
}

export default App;
Now, let's click this button repeatedly.
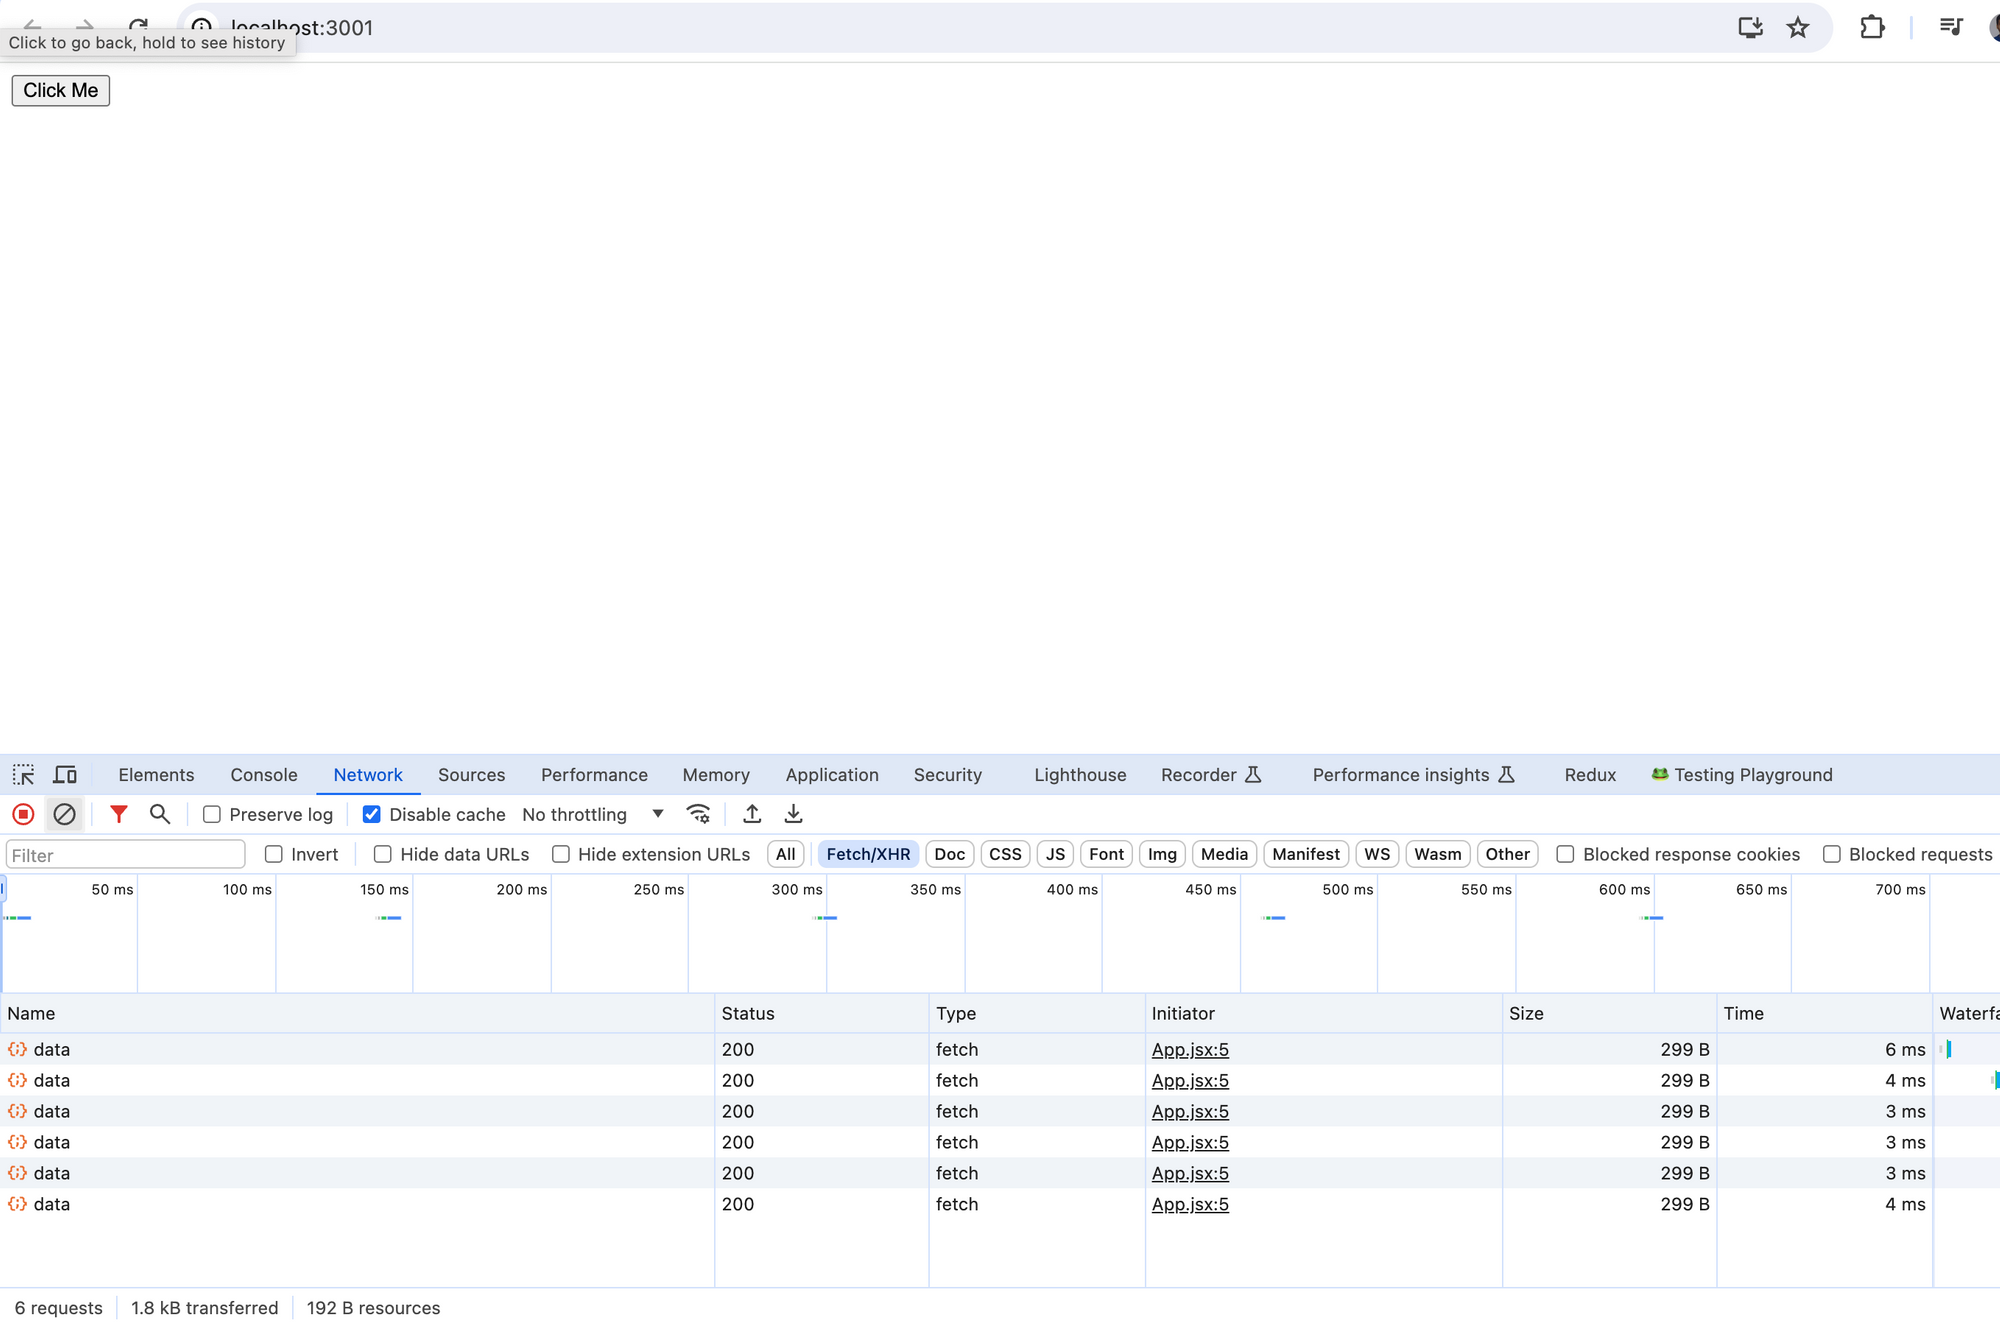
Here, an API call is made every time the button is clicked. So, if the user clicks on the button repeatedly, a lot of API calls will be made in one second. This may overload the server.
To tackle this, we need to prevent the API from getting called on every click of the button. Let's see how to achieve this with throttling.
Implement Throttling using a Custom Hook
We'll write the throttling logic inside a custom hook. Since you may need throttling in multiple places in your application, it is recommended to put the logic inside a custom hook.
Create a new folder called custom-hooks. Inside it, create a file useThrottle.js. Inside the file, create and export new function useThrottle(). The method should take a function and delay as parameters and return the throttled function.
const useThrottle = (func, delay) => {
  let timeout = null;
  return (...args) => {
    if (timeout) {
      return;
    }
    func(...args);
    timeout = setTimeout(() => {
      timeout = null;
    }, delay);
  };
};

export default useThrottle;
Now, inside the App component, call this method and pass the click handler handleClick() and a delay of 1000ms.
const handleClickThrottled = useThrottle(handleClick, 1000);
We'll use this function as the event handler for our button.
<button onClick={handleClickThrottled}>Click Me</button>
Output

After clicking the button repeatedly for two seconds, only two API calls are made.
By limiting the number of times your APIs are called, throttling improves the performance of your application.
Conclusion
In this tutorial, you learned what throttling is and how to implement it. Throttling allows you to control the rate at which a function can be executed in a specific period.
Throttling uses an important concept called closures. They allow you to work with local variables even after a function has finished execution. Closures can be quite confusing for beginners, so take your time with them.
After that, I showed you a common use case of throttling, where you can control how many times an API call can be made on multiple button clicks. I utilized custom hooks to implement throttling in React. This serves to improve the performance of web applications. I hope this helps you in your future projects.
If you are unable to understand the content or find the explanation unsatisfactory, let me know. New ideas are always appreciated! Feel free to connect with me on Twitter. Till then, goodbye!